The Body Lab Advanced Assessment Process
Because moving well is about more than just stretching and strengthening.
Understand the Root of Your Pain
At The Body Lab, we take a deeper look—literally. If you’re experiencing pain, imbalance, or recurring issues that standard approaches haven’t fixed, our Advanced Biomechanical Movement and Gait Assessment helps uncover what’s really going on.
Whether you’re dealing with chronic discomfort, new asymmetries, or that frustrating feeling that “something just isn’t moving right,” this comprehensive first appointment is designed to get you moving better from the ground up.
Why Our Clients Come to Us
Two of our recent clients, Susan and Candice, came in with very different presentations—but both shared a common goal:
To understand why their bodies felt out of balance, and to move with ease again.
Susan’s Story
Susan didn’t have a specific injury—just a growing awareness that things felt “off.”
Walking, training, and even standing still had started to feel awkward and effortful. Her left knee felt unstable, her right hip was tight, and the movements she once enjoyed had become frustrating and tiring.
She’d seen practitioners before, but the gains never lasted.
What she really needed was someone to assess how everything worked together—not just chase isolated symptoms.
Julia’s Story
Julia had been managing lower back and SI joint pain for over 20 years, with hip discomfort since her teens and increasing tension through her neck and shoulders.
With three kids and a lifetime of staying active, she’d adapted—but at a cost.
Recently, she’d noticed new pain in her left hip and a growing imbalance between her right and left sides.
Her goal?
To build a stronger, more balanced body—especially through her pelvis, hips, and lower back—so she could stay active and injury-free.
Step 1: Slow Motion Gait Analysis
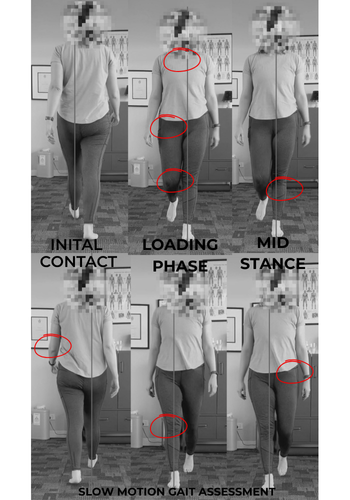
Sample Gait Analysis
We break down the main phases of gait and how you move through each step.
Sample Gait Analysis
We break down the main phases of gait and how you move through each step. We record your walking in slow motion and break it down frame by frame to observe:
How you distribute weight
What moves well—and what doesn’t
Where compensation and overload are occurring
Compare each phase of walking
Left and right foot comparisons
🖼 Image: Gait Assessment Example
Susan’s footage revealed a leftward pelvis shift, limited right hip extension, and reduced spinal rotation—all things she’d never consciously noticed, but which explained her increasing effort with movement.
Step 2: Dynamic Forceplate Assessment

Comprehensive foot assessment and analysis using the latest pressure plate technology.
Measuring total pressure mapping, centre of mass distribution, maximum pressure loading.
Measuring the force during your foot strike and the distribution of force at each stage of the foot’s journey during gait.
We use a digital forceplate to assess how your body manages pressure through each footstrike and push-off. This allows us to understand the differences within each foot and how your body manages load through your foot strike.
🖼 Image: Dynamic Forceplate Assessment
Candice’s graph showed less force on her left side (top image) and delayed loading, which aligned perfectly with her symptoms of left hip fatigue and pelvic instability.
Step 3: Foot Pressure Mapping
We map how force travels through your foot during every step:
Where you land
How you transfer weight
Where (and how efficiently) you push off
🖼 Image: Dynamic Individual Foot Pressure
Both clients showed force exiting through the 5th toe, bypassing the big toe—reducing power, balance, and stability.
Comprehensive foot assessment and analysis using the latest pressure plate technology.
Measuring total pressure mapping, centre of mass distribution, maximum pressure loading.
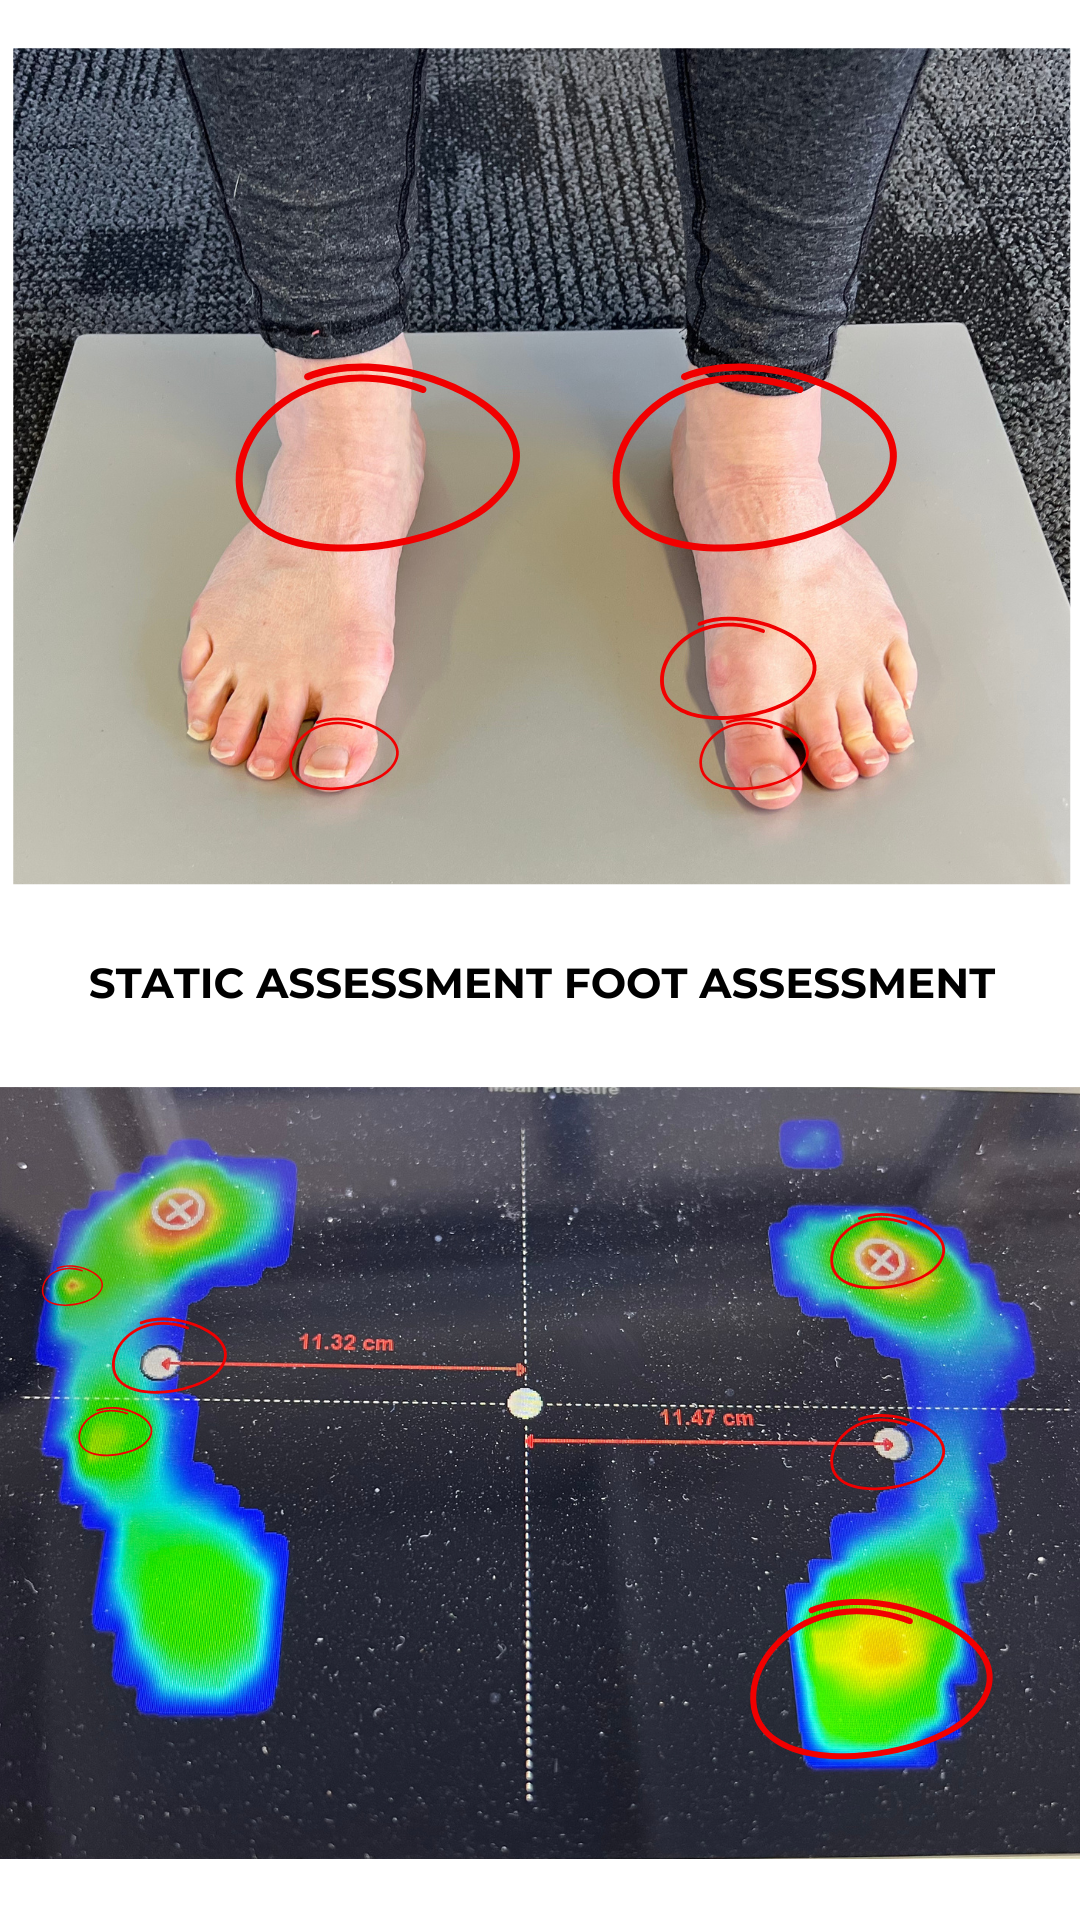
Step 4: Static Posture & Foot Scan
Your still posture reveals how your body’s compensating—even before you move. The advanced technology allows you to really see where you place all your weight and force.
We assess:
Foot structure, alignment and pressure loading
Ankle rotation and force distributions
Forefoot pressure and arch development
Pelvis, spine, and ribcage positioning
🖼 Image: Static Assessment Foot Assessment
Susan’s scan showed internal ankle rotation and a left pelvic hike.
Candice showed forefoot overload and a pelvis shifted left and rotated right.
What We Found – At a Glance

Step 5: Movement Assessment – Functional Joint Motion in Action
After understanding your symptoms and reviewing your gait, we dive into how your joints actually move—especially in relation to walking.
This isn’t your standard “bend-and-touch-your-toes” kind of test. We guide you through dynamic movements that replicate real-life walking patterns, helping us pinpoint the exact joint(s) contributing to dysfunction. We’re assessing:
How each segment (toes to skull) responds during full-body movement
Whether certain joints are compensating for others
Which areas need mobility vs. stability
This provides a crucial bridge between what we see in your walk and what’s happening within your body’s movement system.
Step 6: Postural Assessment – Stillness That Speaks Volumes
Movement is dynamic—but your static posture can reveal a lot. In this step, we look at:
Alignment of your spine, pelvis, knees, and feet when standing
Side-to-side discrepancies (e.g., one hip higher, one shoulder rotated)
Forward head posture, scoliosis tendencies, and more
This bird’s-eye view of your structural baseline helps us understand long-standing habits, compensations, and imbalances that may be driving your movement dysfunction.
Step 7: Joint Motion Spring Testing – Is Your Body Transmitting Force or Stuck in Its Tracks?
Ever wonder if your joints are truly “doing their job”? This is where we find out.
We apply gentle, targeted pressure to assess each joint’s ability to spring or absorb motion. It’s like a systems check for your musculoskeletal framework.
This test helps determine:
Which joints are transmitting motion well (think “springy” and responsive)
Which ones are restricted, blocked, or compensating
How load transfers up the kinetic chain (e.g., from foot to pelvis to spine)
Why does this matter? Because a joint that doesn’t move well creates a ripple effect—forcing other parts of the body to work harder and often leading to pain or inefficiency.
Final Step: From Assessment to Action – Your Personalised Treatment Plan
Now that we’ve gathered the data, filmed your gait, tested your joint motion, and listened to your body’s patterns—it’s time to act.
At the end of your assessment, you’ll receive:
A personalised treatment plan tailored to your unique findings
Targeted movement strategies to restore better joint timing and control
Hands-on treatment (where appropriate) to address restrictions and dysfunctions
Home-based exercises to reinforce progress between sessions
Clear next steps—including how many sessions we recommend and when to reassess
We usually suggest 2–5 sessions to start. This gives us time to restore motion, retrain your body’s movement patterns, and build the strength and control needed to sustain those changes long-term.
Because the goal isn’t just temporary relief—it’s lasting change.
The First Step in Your Plan
This Advanced Assessment is the starting point of your journey at The Body Lab.
It’s where we:
Get to the root of the issue
Help you understand your body and how it’s been compensating
Begin retraining your movement system from the ground up
We typically recommend 2–5 sessions following the assessment to:
Restore lost mobility
Re-establish efficient joint timing and foot function
Begin layering in strength to support long-term movement quality
Mobility First. Strength Always Follows.
Strength is a key part of our method—but only after we’ve restored healthy motion and joint control.
Building strength on top of dysfunction just reinforces compensation.
At The Body Lab, we focus on clean movement first, then build strength that lasts.